Showing posts with label photography. Show all posts

Friday, March 4, 2011

What's The Bright Idea?

I like experimenting with my camera in an attempt to get the best Straight-out-of-camera (SOOC) shots I can. A lot of my motivation behind pursuing good SOOC pictures is to avoid so much time editing them to my satisfaction. Unfortunately my pictures almost always require at least a little bit of editing. I do have to say though, when time is available for it, editing pictures is a fun way to experiment with your creativity.
Spending many hours 'gimping' my pictures in not uncommon. When that much time is invested in creating a visual 'masterpiece' (granted "eye of the beholder"), nothing blows the wind out of your sail like finding out bad your picture looks on another computer.
Case in point, below are some pictures I edited to have a visually-pleasing contrast to brightness ratio...not too bright, not too dark and not too washed out. I originally edited the pictures on my LCD laptop screen.
Feeling pretty satisfied with how the pictures looked, I was disappointed when I saw them on my CRT desktop monitor.
So I decided to edit them on my CRT monitor, compare them side by side.
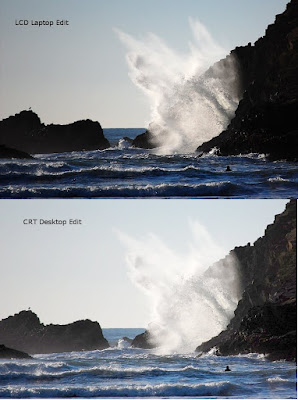


Which edit looks better on your screen and what type of screen do you have?

If the pictures look so much different of different computers, how can I be sure they look the same when I get them printed on photo paper? My wallet certainly isn't willing to find out the answer.

CRT monitors, my preference, probably have a more consistent picture, but are often dark. LCD screens are nice and bright; maybe even too bright causing whites to glare and textures to disappear--even if they are high definition screens. One of my pet peeves with LCD monitors is that their picture quality varies depending on one's view-angle to the screen.

So here is the picture editor's dilemma: how can you guarantee a good-looking picture on various viewer's computer screens? More importantly, how can you know your edits will look good when the picture is developed?

I'm not sure there is a guarantee, but I have learned a few tricks.

1. Trust the photo-editing software's 'judgment' of a good edit as a reference point. More than likely your picture-editing software has buttons that automatically balance the contrast/brightness and colors. I also use the histogram to help me know how to trim the brightness and the contrast. Sometimes I use Gimp's Levels eye-droppers to make whites white or grays gray. Unfortunately, relying on the software is no guarantee you will have a good-looking picture. Relying solely on the software can also dampen creativity. Although I've learned to trust the software, I only use it as a reference point--not an end-all solution.

2. Calibrate your monitor's contrast, brightness and color to a standard reference. Many Disney and other DVDs contain a monitor optimization tool in their setup menu. This tools walks you through a step by step process to change your TV and monitor settings to optimize the picture quality. Especially for LCD screens you may need to use the advanced display settings to get a decent configuration.

I recently found a free software program, Calibrize (http://www.calibrize.com/), that walks you through a screen configuration wizard then saves the settings allowing you to simply click a button re-optimize your configuration. This program recommends recalibrating your monitor every two weeks. I am planning to recalibrate every time I edit pictures on my laptop to compensate for whatever angle it has when I open it up for that session. Some non-free software, to justify a consumer's financial sacrifice, may do a better job of optimizing your screen. In any case, free or not, I strongly recommend researching a product before investing in it.

3. Purchase a monitor built to provide true color and light balance. Using one of these screens is probably the closest thing you will get to a guarantee that what you see on the screen will also come out on a print. Of course these are priced for professionals who see it as a necessary investment.

Maybe you have some tricks you've learned to make sure your pictures look great on a wide variety of monitors and, for certain, look good after printing.

Sunday, May 23, 2010

The RAW Deal

Most digital SLR cameras record their pictures a jpeg (.jpg) images. However the language the camera uses to understand the image it sees before it translates it to jpeg is called the RAW data. There are differing opinions (among both professional and non-professional photographers) about whether or not it is better to shoot RAW or let the camera just translate it directly to jpeg or other common picture formats.

RAW contains a lot of information about the image so it consumes a lot of file space on the memory card and on the computer. RAW may also require special software and/or codecs so you computer can actually read the picture information. (I use the free UFRaw in conjunction with Gimp.) However, since RAW is how the camera sees the image information, it arguably provides more accurate images. Editing RAW images may also retain its information quality. Before you share RAW images, you have to translate them to jpeg or another format so others can view them. RAW is ideal for pictures to which you are planning to do some sincere quality editing.

Jpeg is a compressed picture format. As such a storage card can hold more pictures (with my Nikon D40, the highest quality .jpg photo is half the size of the RAW data). Conveniently, all computers can already read and edit jpeg files. However, since the jpeg is a translation of the camera information compressed into a smaller file, reduction in quality and loss of picture information may exist. Each time you edit jpeg the quality of the picture degrades. Jpeg format is great for everyday sharing of pictures and if your not really picky about the little intricacies of how the photo looks.

I used to be biased towards jpeg, but I've been playing with RAW a little bit more lately. I'm still torn on which one I like better. The jpegs come out great...and with some minor editing can look pretty nice. However I like the more natural color quality in the RAW images with which I've played. In my experience there editing raw is a little more labor intensive than the pre-adjusted jpeg images, but that is kind of the point with the RAW images. I also notice that RAW reveals a lot more detail and texture than the jpeg translations and its it easier to correct over and underexposed pictures in RAW.

I think the only way to tell which one you like better is to try them both. Below you can see a jpeg simple edit compared to a RAW (Nikon NEF) simple edit to see what you think. (Click the picture if you want to see more detail.)


Jpeg


RAW


Jpeg


RAW


Jpeg


RAW


Jpeg


RAW

But don't just use my experience...find out for yourself.

Sunday, August 9, 2009

A Bug's Eye View (photos by C--age 6)

My six-yr-old son wanted to take some pictures, so I challenged him to take pictures of from a bug's perspective. I prompted him on some ideas, but he took the pictures all by himself. We had a lot of fun together. I thought several of the pictures turned out pretty well:


Some bugs crawl on our back steps.

Some bugs climb up on the fence.

Some bugs climb up trees.


Some bugs crawl through a garden forest. This bug is entering the corn forest.


Some bugs crawl sideways along the back fence.


Some bugs run into scary, poking giants.


Some bugs become suddenly acquainted with the tread on some shoes.


Some bugs just congregate.

Tuesday, May 12, 2009

A Few Recent Pictures

I haven't been in a talkative mood these days, so I thought I'd just say a few thousand words:

Flight Maneuvers


Eye Witness


Make a Wish


Our first somewhat close-ups of a wild Bald Eagle.


Surrounded by Beauty


I love my family.

Sunday, March 15, 2009

Almost-Spring Sunsets

I haven't posted pictures for a while. Here are some pacific ocean sunset pictures from the last few months:


Sun's Eyes Half Closed


Crisp, Cool Silhouettes

"C'mon kids come home and get ready for bed."


Come Down to Rest

Venus Watching Over Sleepy Fishing Boat.

Saturday, January 17, 2009

Polarizing Effect

I remember playing with polarizing filters in Science class in High School. I thought is was cool how they darkened the sky or removed reflections depending on which way you turned the filter (to allow only certain light waves to pass through).

Since then, whenever I played around with photography, I always wished I had a polarizing filter.

Well, my wish came true this Christmas, and now that the snow, ice, rain, wind and cloudy skies finally took a break, I had the opportunity to experiment a little bit with it.

This is "without" the polarizing filter (actually the filter was on the camera, just not turned to only allow the rich colors to come through).


This is with the polarizing filter. It really brings out the dark blue sky.

Without. Notice how yellow the tree needles are--probably from all of the random light rays reflecting off of them.

The polarizing filter made the colors more rich by filtering out the random reflected light waves.
Although our camera has Auto adjustment features, I like to use the manual settings to help me learn how to control the picture. I learned that the polarizing filter darkens the subject so you have to adjust the speed or aperture to compensate. Our camera has a built-in light meter to help indicate when adjustments need to be made.

This demonstrates how the polarizing filter can reduce reflections. Notice the solid colors of the creek. Without the polarizing filter, the water would have a whitish haze, particularly over the top right corner of the photo, as it reflects the sky.

A polarizing filter is a nice little tool to make colors rich and reduce unwanted reflections.

Monday, December 22, 2008

Christmas Candy Train and other Pictures

Christmas Train made out of graham crackers and some of my favorite candies.

Interesting icicle structure. The icicles dripped from the snow on the roof, but the snow started sliding off the roof and curled around.

I haven't posted a 3-D picture for a while. Here is a 3-D picture of the Christmas Train.

Friday, December 12, 2008

Love the Lights!

I really enjoy trying to capture Christmas lights and glowing ornaments on digital 'film'--even though it never comes close to how magical it is live.

If you've been to the Caretaker's Cabin lately, you already saw this dragon and the jaw-dropping alligator (below) from the Oregon Zoo Lights.


The Oregon Zoo Lights were spectacular. In the field in front of the stage they created a whole animal world of lights.


This year we made snowflake ornaments using beads and pipe cleaners. I like how the lights reflect and refract through the clear beads

Each year this house is very-well decorated for the Christmas Holiday--every year it seems to become more and more spectacular. They even play Christmas Carols through loud speakers. (Click to see a bigger picture.)

Tuesday, October 28, 2008

Monster House Lives!!!

note: click the pictures to see more detail
Every year about this time Monster House rises from the depths.

(The most viewed entry of all time on my blog is last year's picture of Monster House.)


What good is Halloween without real spider webs adorning your house (inside and out.) I love to see the perfection (and the unique, custom imperfections) in a carefully spun web--the details are fascinating to me.


Nothing says, "Where's the fresh Hot Apple-Cinnamon Cider" better than the warm glow a Jack=o=lantern on a crisp, see-your-breath, fall night with leaves crunching under your feet.


Spring and Fall are my favorite times of the year: bright new colors spring-up all over the place!


You can't have fall without Candy Corn made with sweet honey!

Tuesday, October 14, 2008

Prayerful Study

A few recent Photography Experiments:

Prayerful Study

I like the details and personal symbolism in this still. A few candles, glow from the computer monitor and a 20-second shutter w/ no flash on a tripod.


First Frost Mountain Range
I didn't appreciate trying to scrape this off the windshield, but its delicate textures made taking a picture irresistable.

My Favorite Girl